

Table of contents
As kids, my brothers and I would spend the summer holidays with our family on the countryside. While my brothers enjoyed the great outdoors, I would spend a good amount of my time in the garage, creating something which I had called machines.
When the question about my day came up, I’d always say…
“I was building machines.”
These contraptions consisted mostly of different pieces of wood and/or metal coupled together by rope, nails or screws. Most of them had no purpose in the real world, but at the time they fulfilled some childish need of mine.
Be aware that any kind of visual documentation of these objects would look like the image below. No one but me, at the time, could make sense of them.
Well, look at me now, world!
I create machines with machines for machines. Interface after interface, the thirst cannot be quenched. I can freely say that this hobby of mine has outgrown itself into a full blown addiction. Heck, I’m even writing about it!
A cause for a celebration
Let’s treat ourselves with another interface. But, this time we’ll spice things up. We are not going to conform to prebuilt enclosures. This time they shall adopt to our needs.
First, let’s round up the needed crowd. On our journey will need a couple of things:
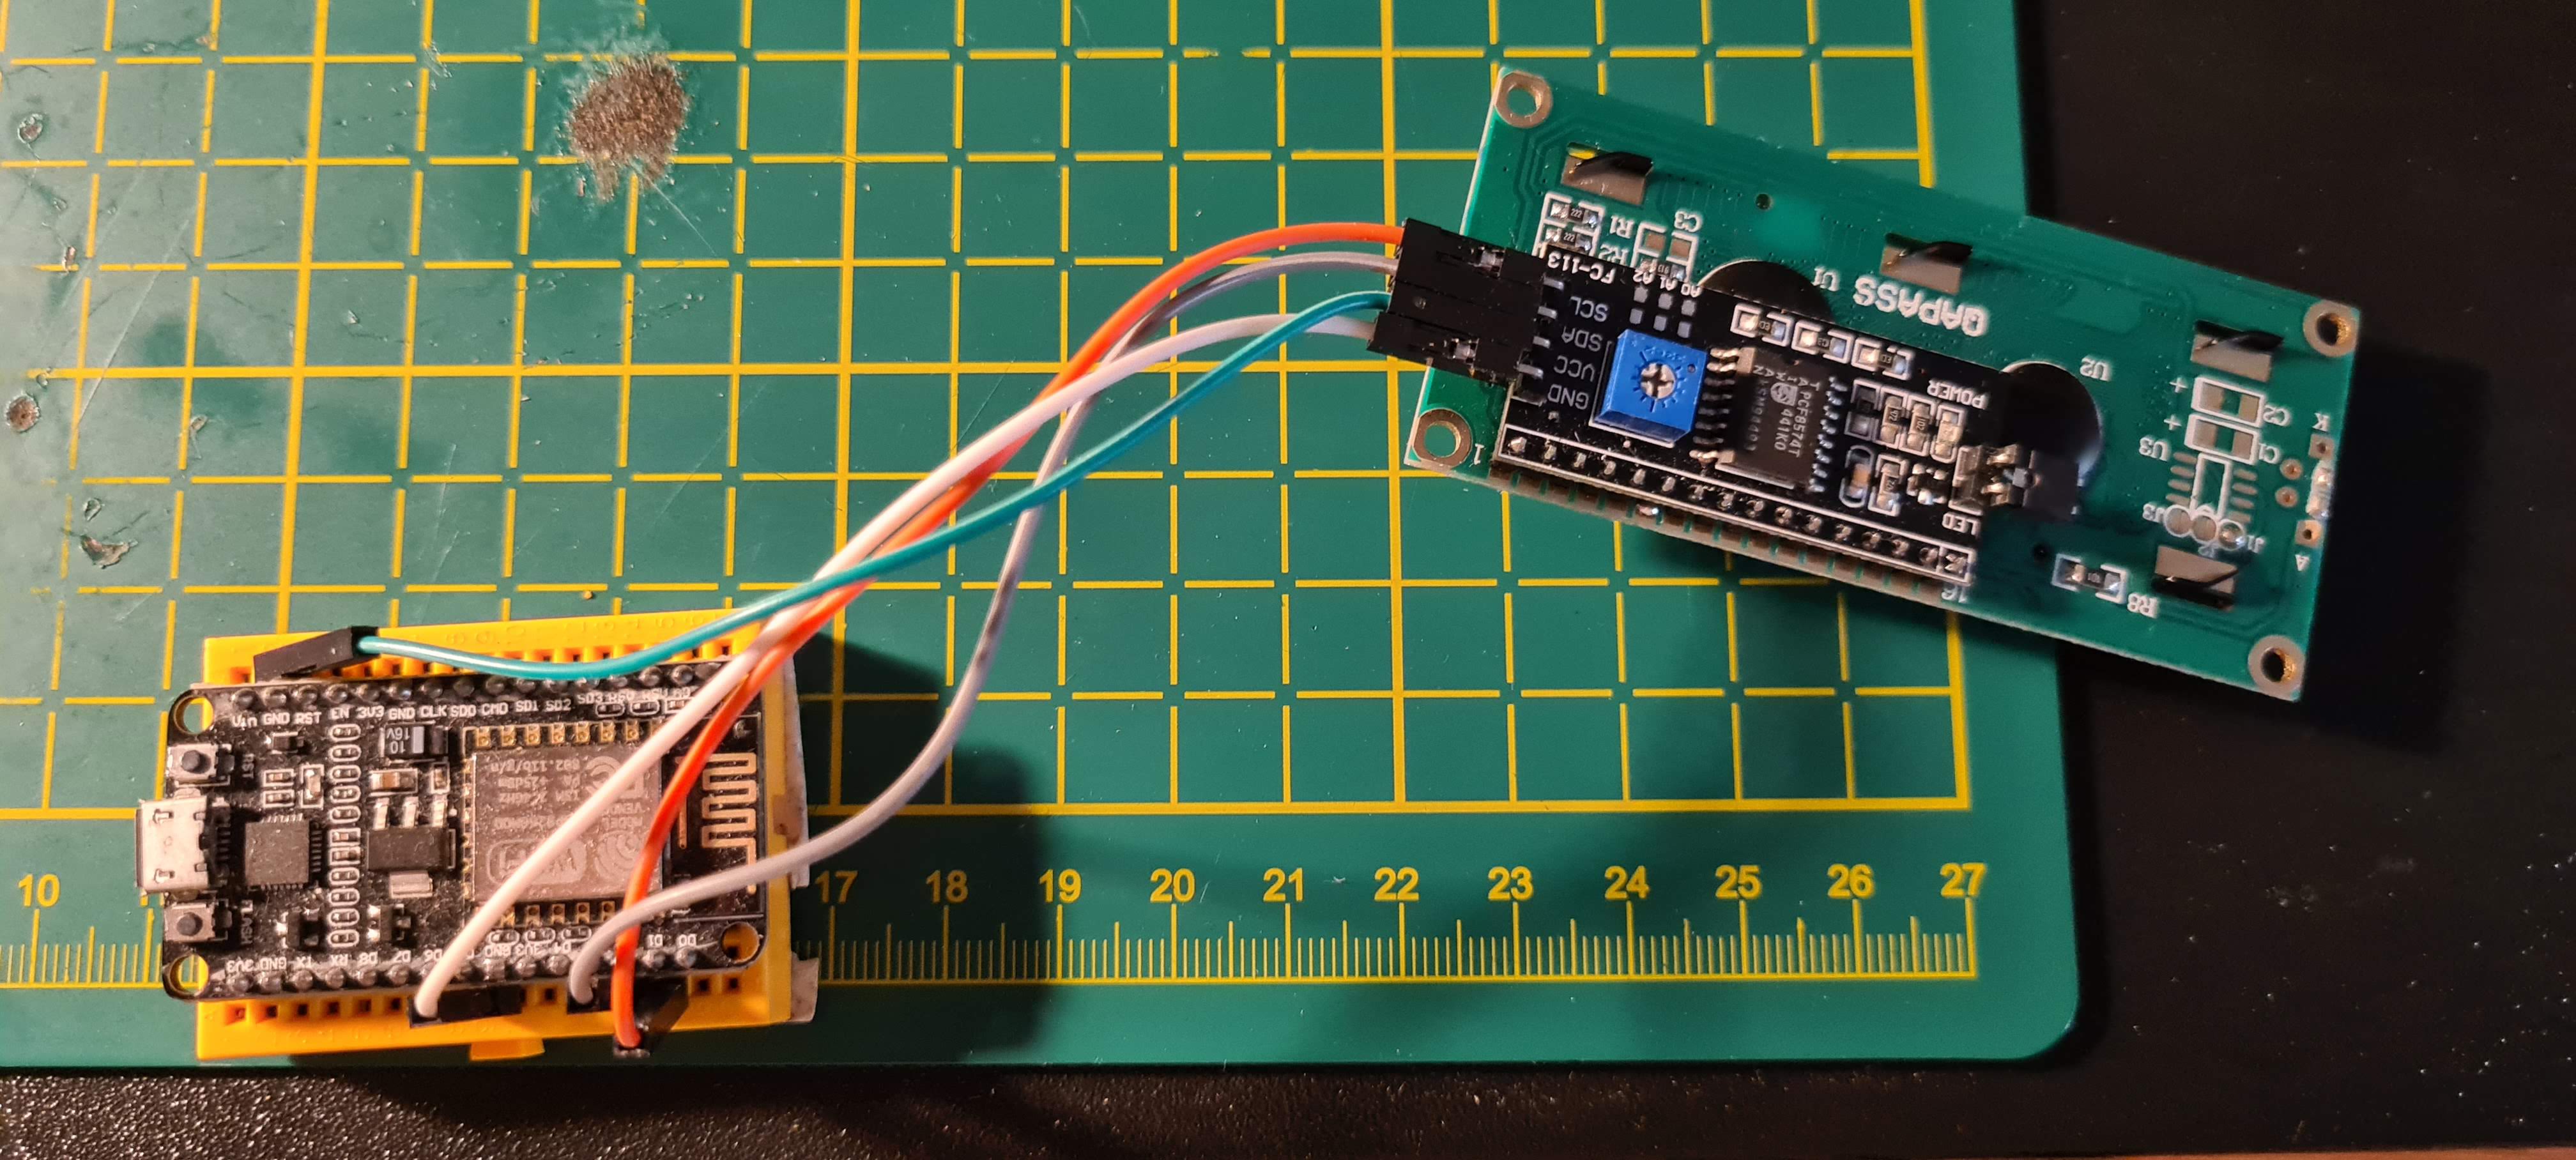
- ESP8266 Microcontroller
- 16x2 LCD Screen with I2C
- Analog Potentiometer
- Jumper wires
- Micro USB cable
- Breadboard
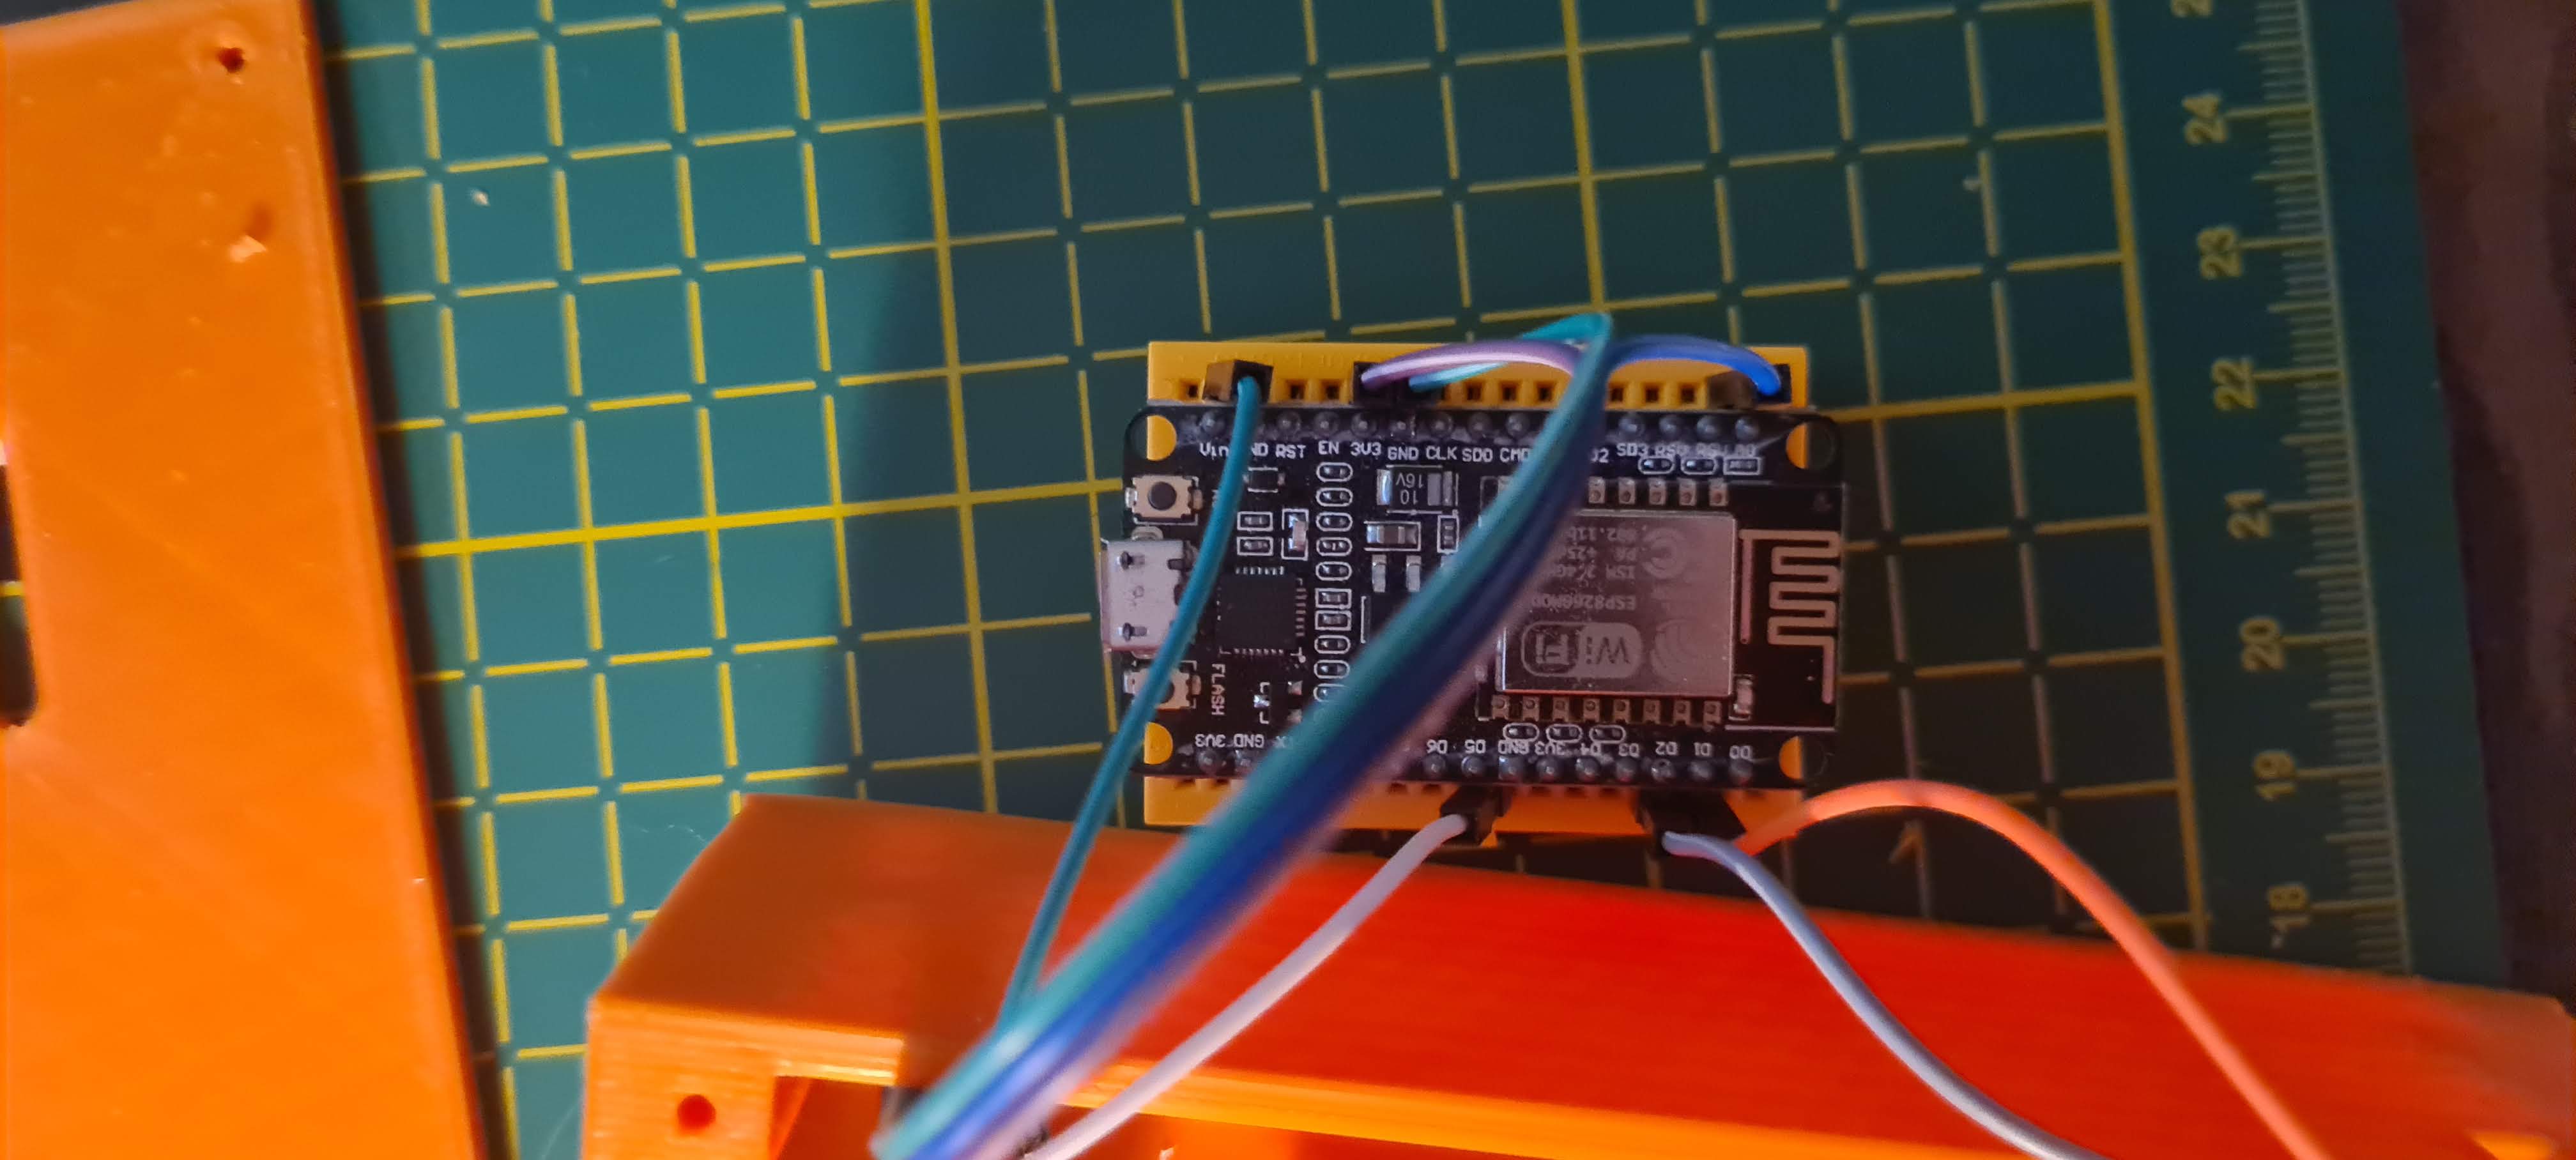
If you wish to size thing up, you could use a larger screen. The I2C adapter is not mandatory but it gives you a 4 pin interface instead of the default 16 pins, with a small potentiometer for adjusting the screen contrast. Smash everything together. To get things started, we’ll take a bucket and put the board, potentiometer, LCD screen and the jumper wires inside. Raise the bucket above your head and shake it. Lower the bucket after 20 seconds and take a peek inside.

The components should be connected like this. The breadboard manifests itself during the high collision of components with the sides of the bucket.
If you notice a misalignment, try shaking the bucket it in different directions. That should help. Some people reported that using a red bucket increases your chances for a quicker connection.
When you feel that everything is in order, proceed.
If we align to the definition of the machine, the build should have a very personal feeling to it.
So… no coasters this time.

We desire to mold. And mold we shall.
How does one…
A year and a half ago, right before covid came into town, I was hanging with a group friends at a birthday party.
Interestingly, the star of the party was not the person whose year count had the smallest deviation from a natural number, but a machine. One that could print on top of its former prints. Layers, we would call them.
We used this machine to bring imaginations and impossibilities to life, create geometric structures which were formerly impossible to construct without combining multiple parts together. Nerd heaven. Of course, we are talking about 3D printers.

Remembering this as my first encounter, I queried my friend Chris about the possibility of him printing an enclosure for me. With him being a top notch engineer I was sure that this will go well, because he would be handling the printing part.
He confirmed and offered me a broad color palette to choose from.
Noice! I only had to deliver the model to him.
The model
During the formerly mentioned birthday party, I got acquainted with the world of 3D printing quite well. Thus, I remembered the mainly searched cloud platform for sharing printable models, called Thingiverse.
I began searching, but quite quickly found out that either this platform uses a bad searching algorithm, or I just couldn’t find what I was looking for. I wanted a simple enclosure which would fit all the components and have an entryway for a MicroUSB cable. I found one, at last.
It was not ideal, but I know my way around creating and editing 3D models quite well, and was able to modify the original model, ditching the D-Sub opening, creating a small rectangular one for our cable.
I sent the model back to Chris, with my fingers crossed.

This really showed me the capabilities of these things, and proved my thesis of a need for buying a printer for myself in the near future. Or coasters. IDK. People seem to really like the coasters.
Two days passed…
Slack rang. I was in my car and at Chrises house in a matter of minutes. And, oh boy, he did not disappoint.

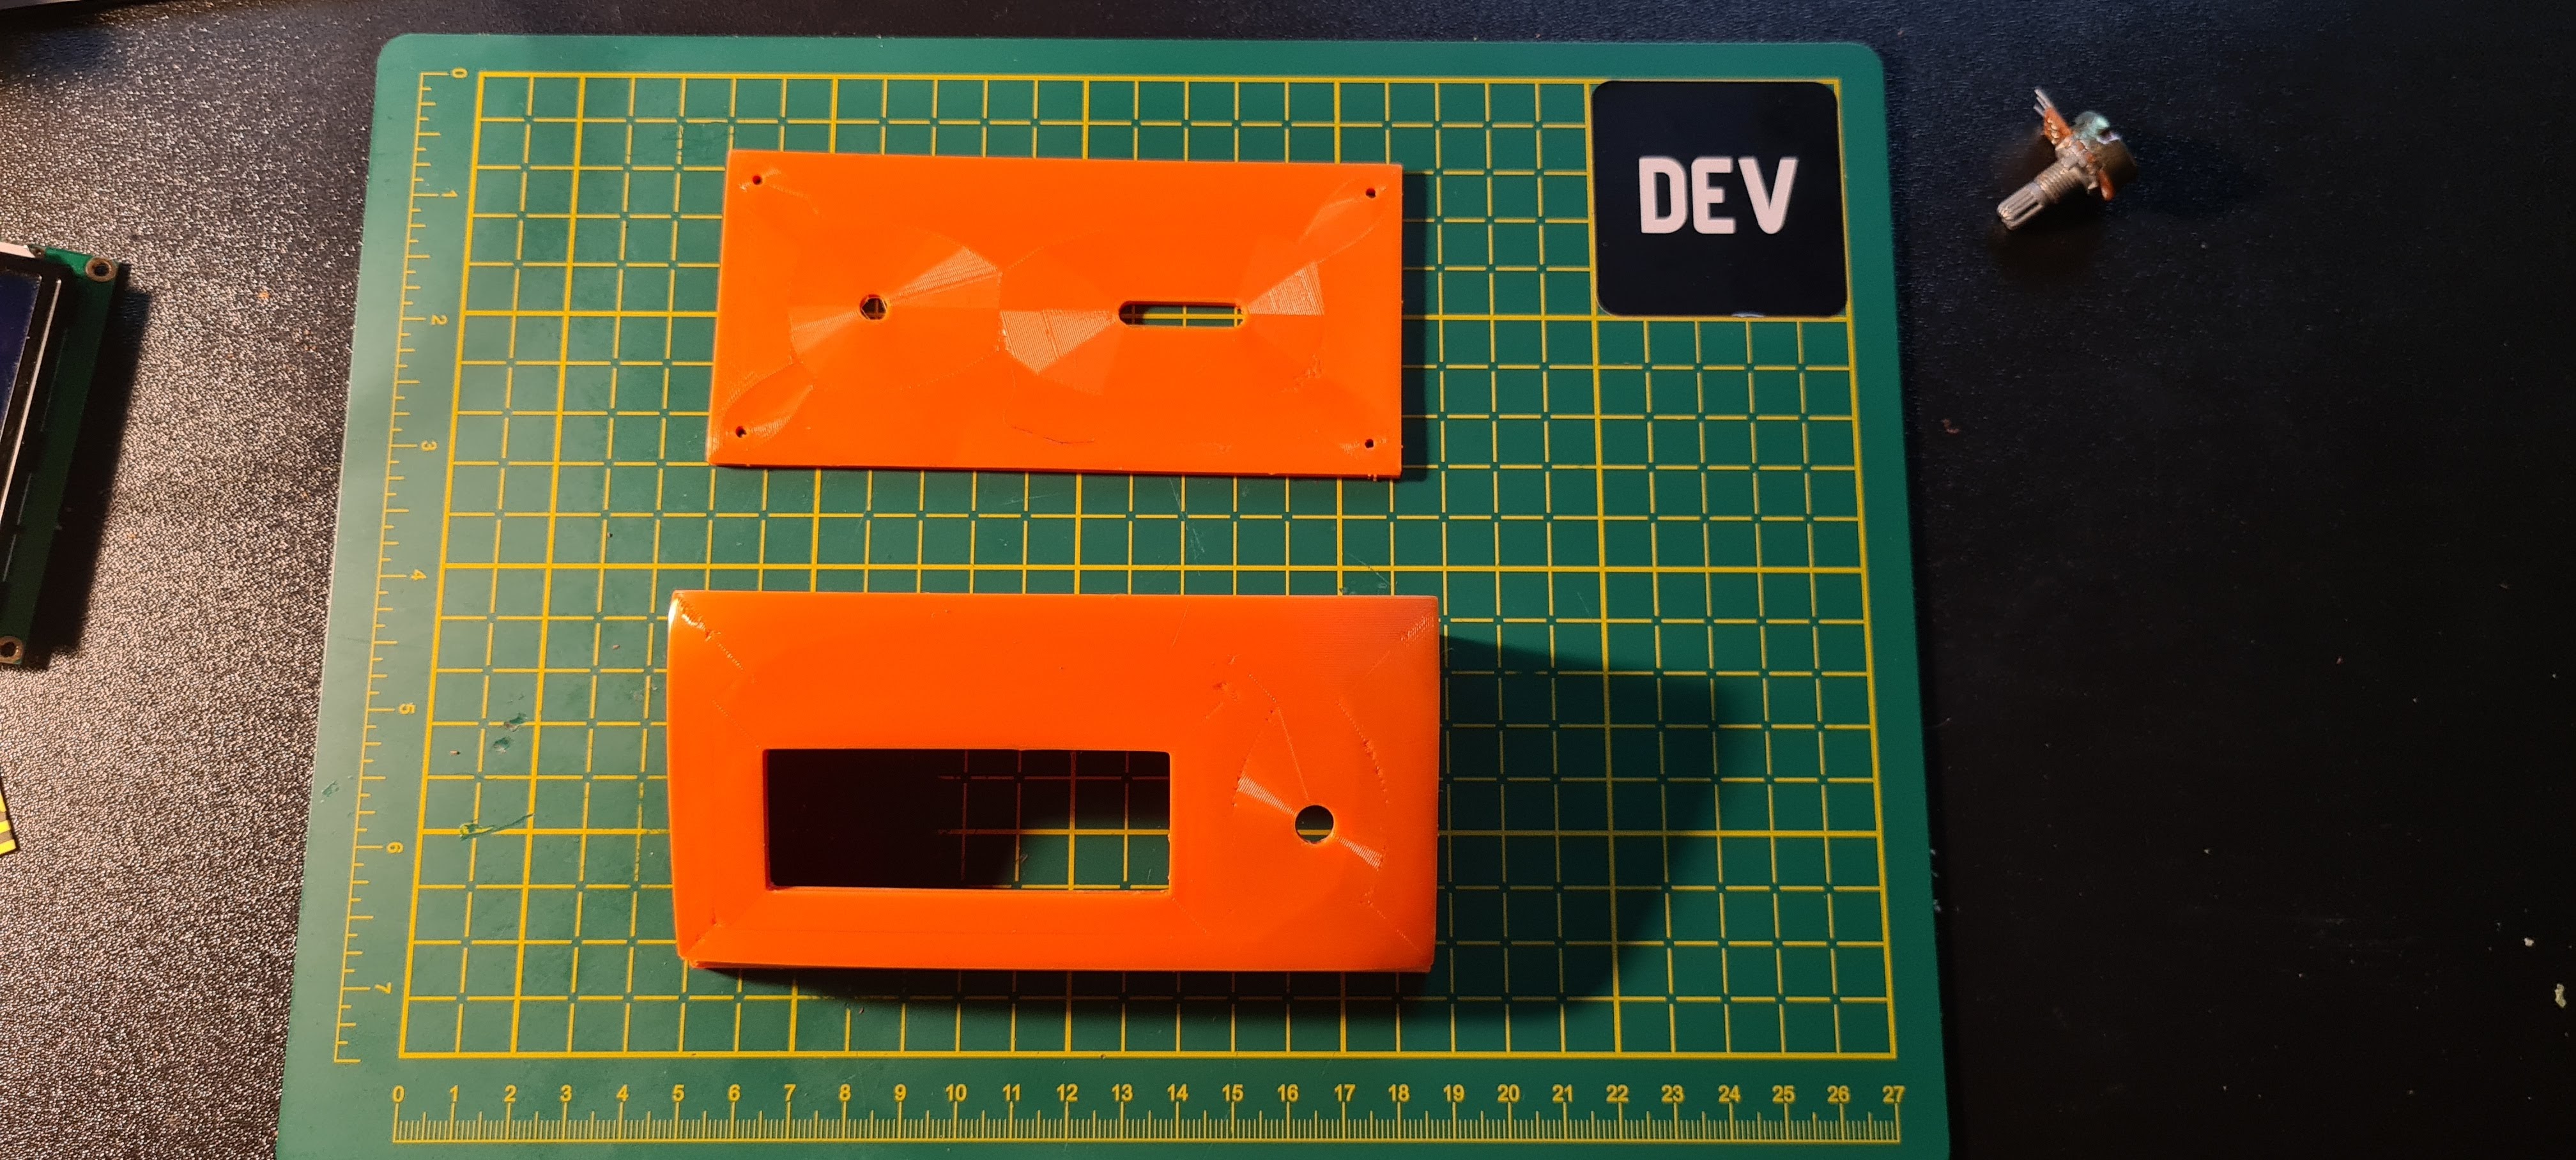
Fun fact, the slanted edges of the enclosure are actually a common artefact caused by the uneven cooling, and thus shrinking, of the material during the printing. But it gave the model a more modern look, so we went with it. Seems like a bug manifested itself as a feature. Good stuff!


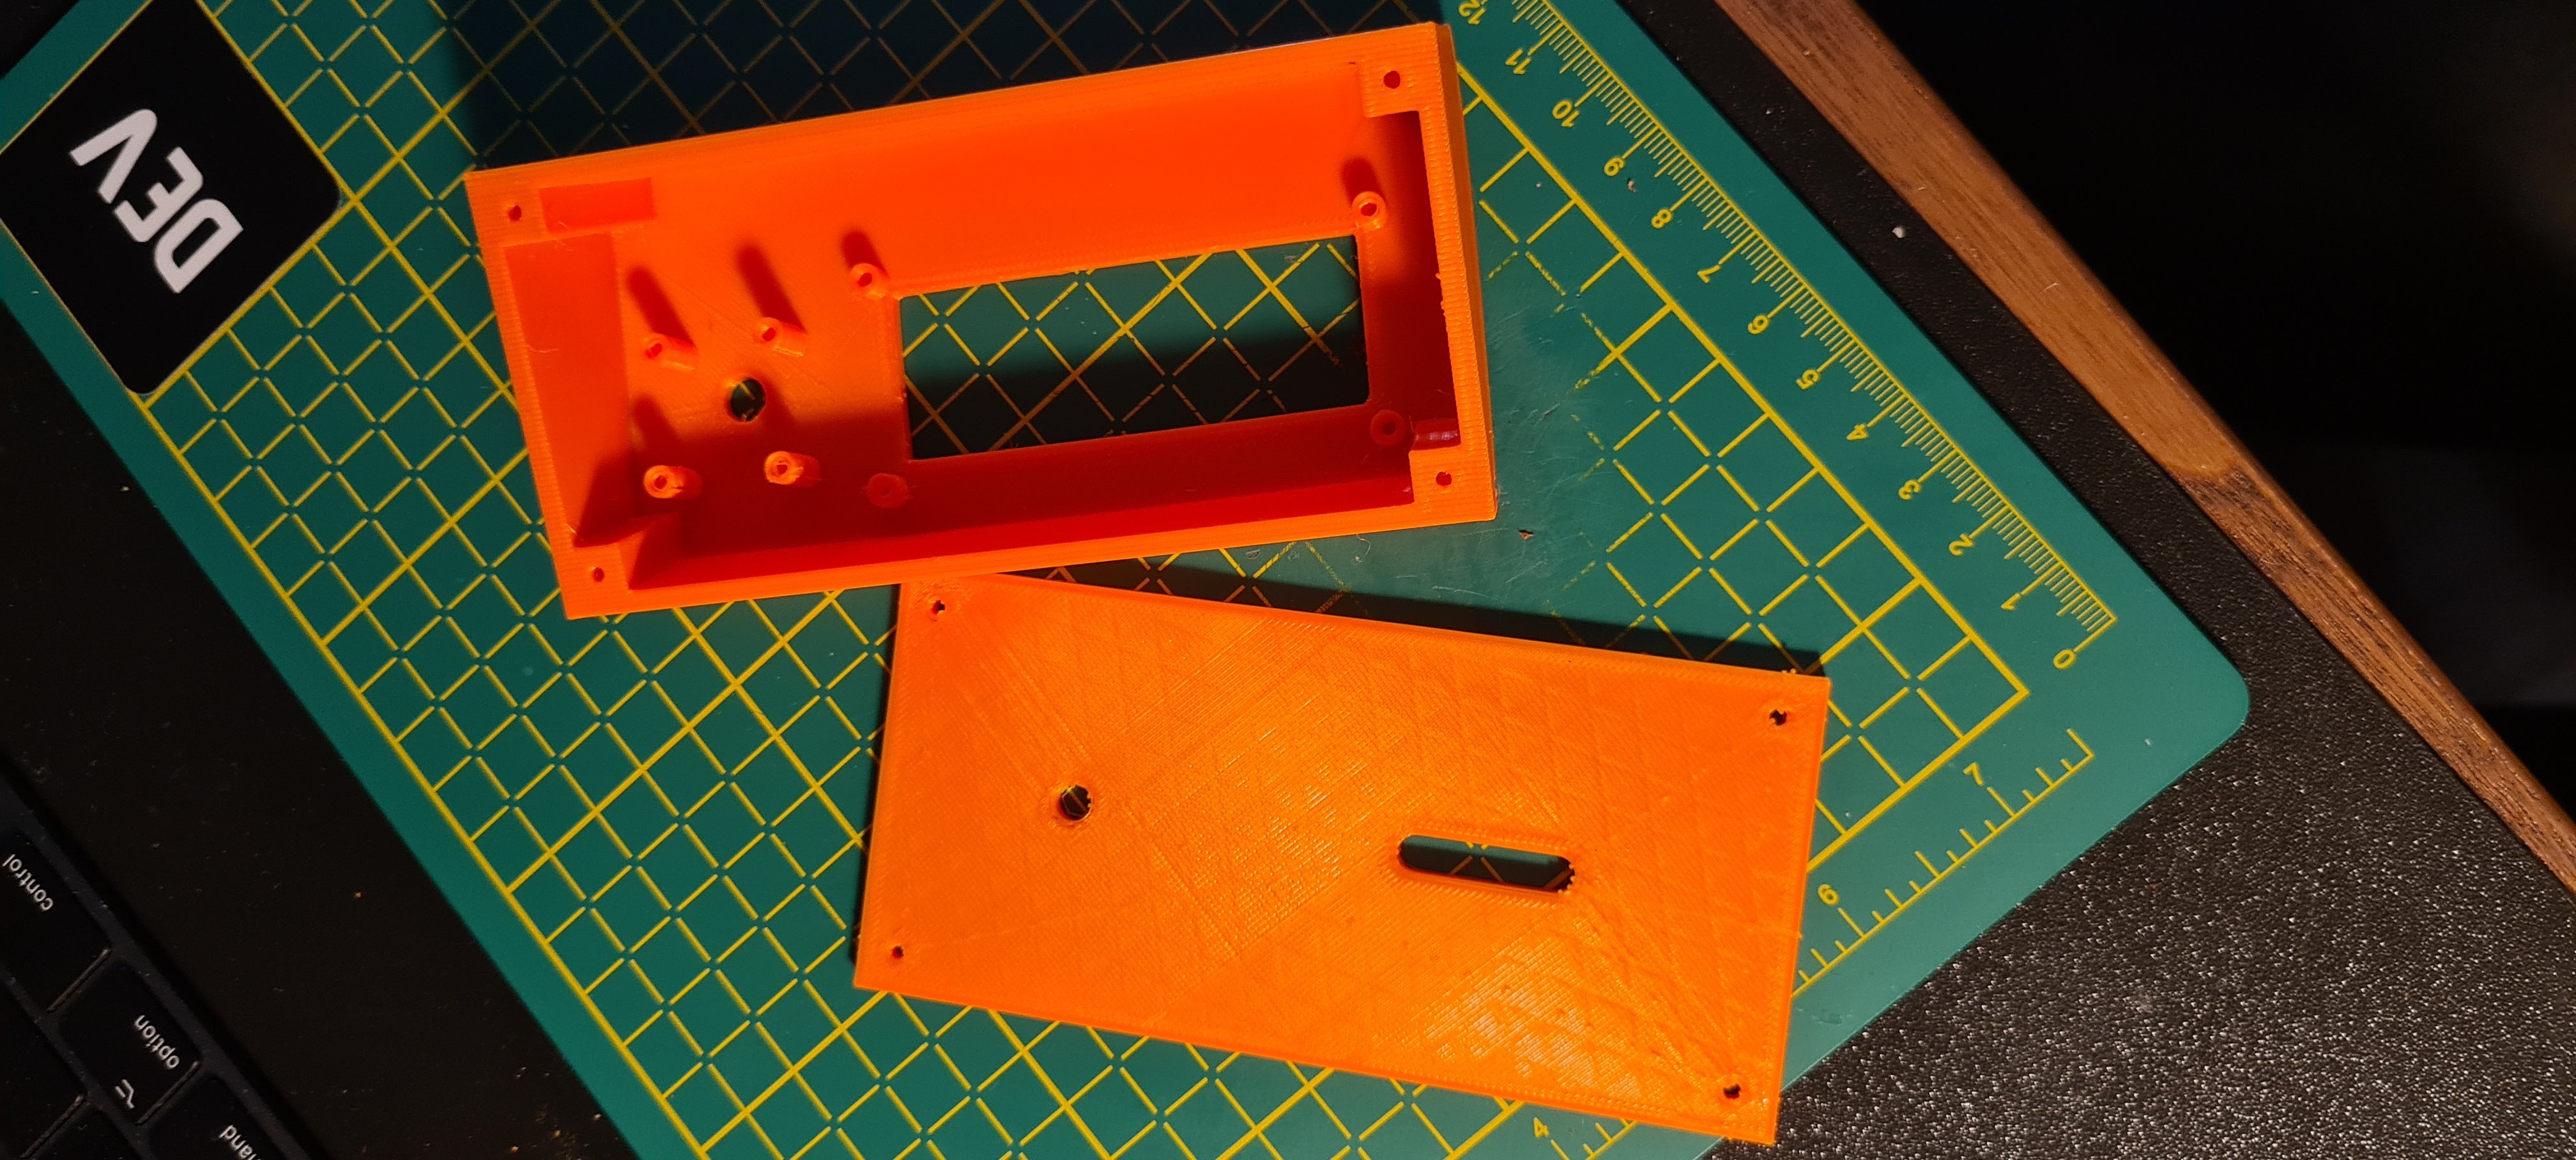
So, now that Chris got us on the right track, let’s put all of our components inside the enclosure.

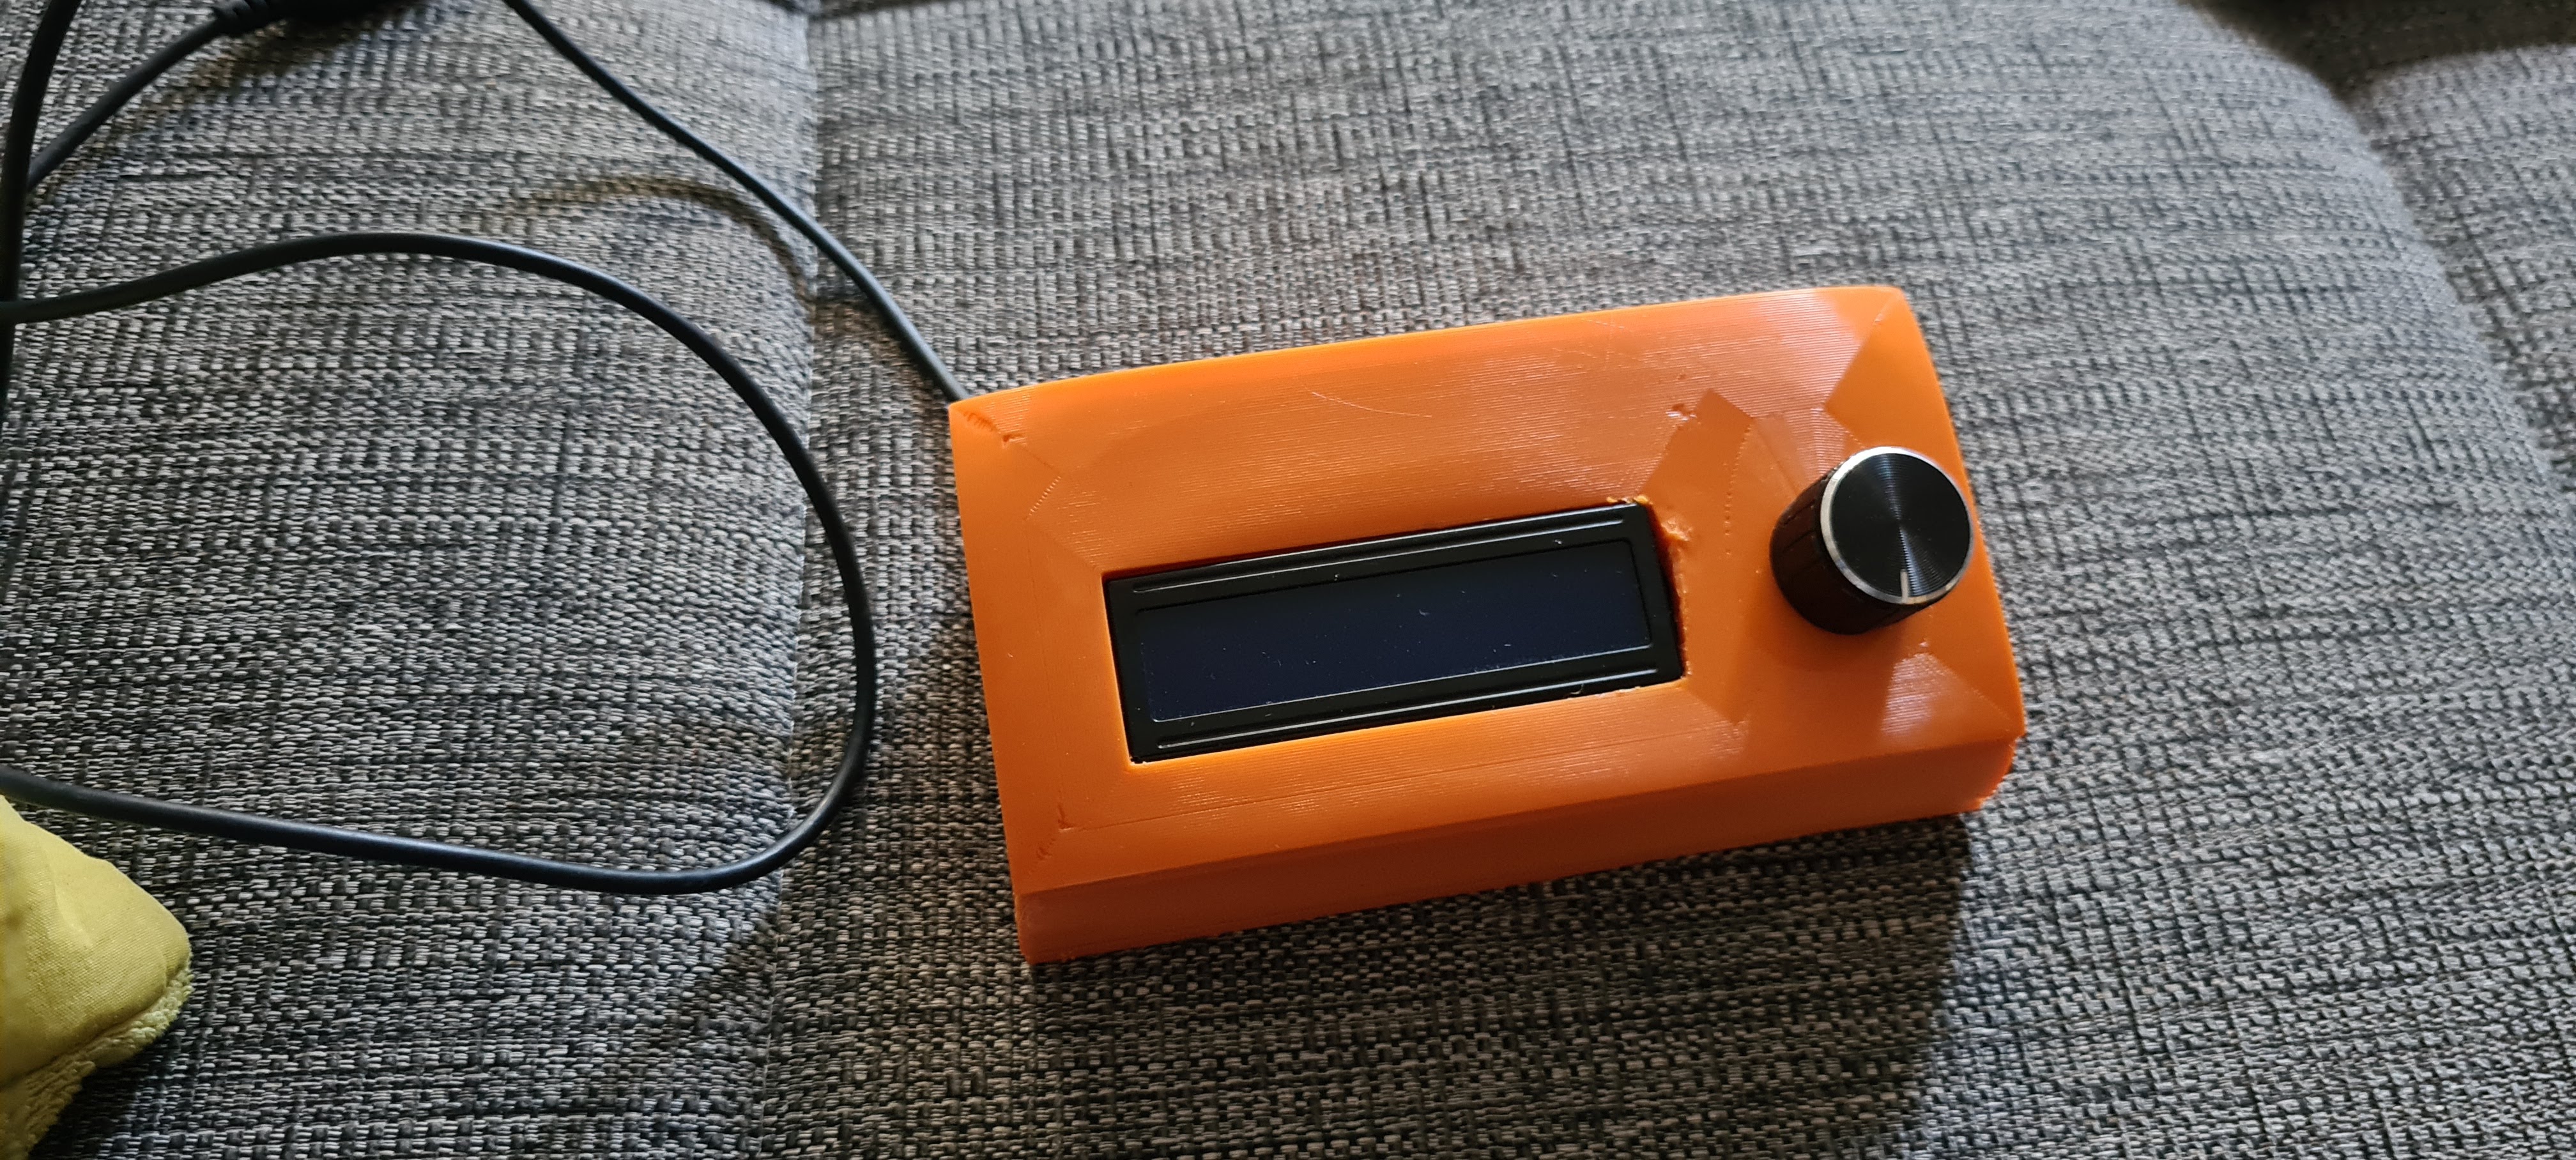
We’ll make everything sit into place snuggly and use a glue gun to make sure the components are fixed in place. After that, thread the Micro-USB cable through the hole on the back and plug it into the NodeMCU.
Five + One = Five
We are finished on the hardware side. But what are we going to achieve with a potentiometer and a screen?
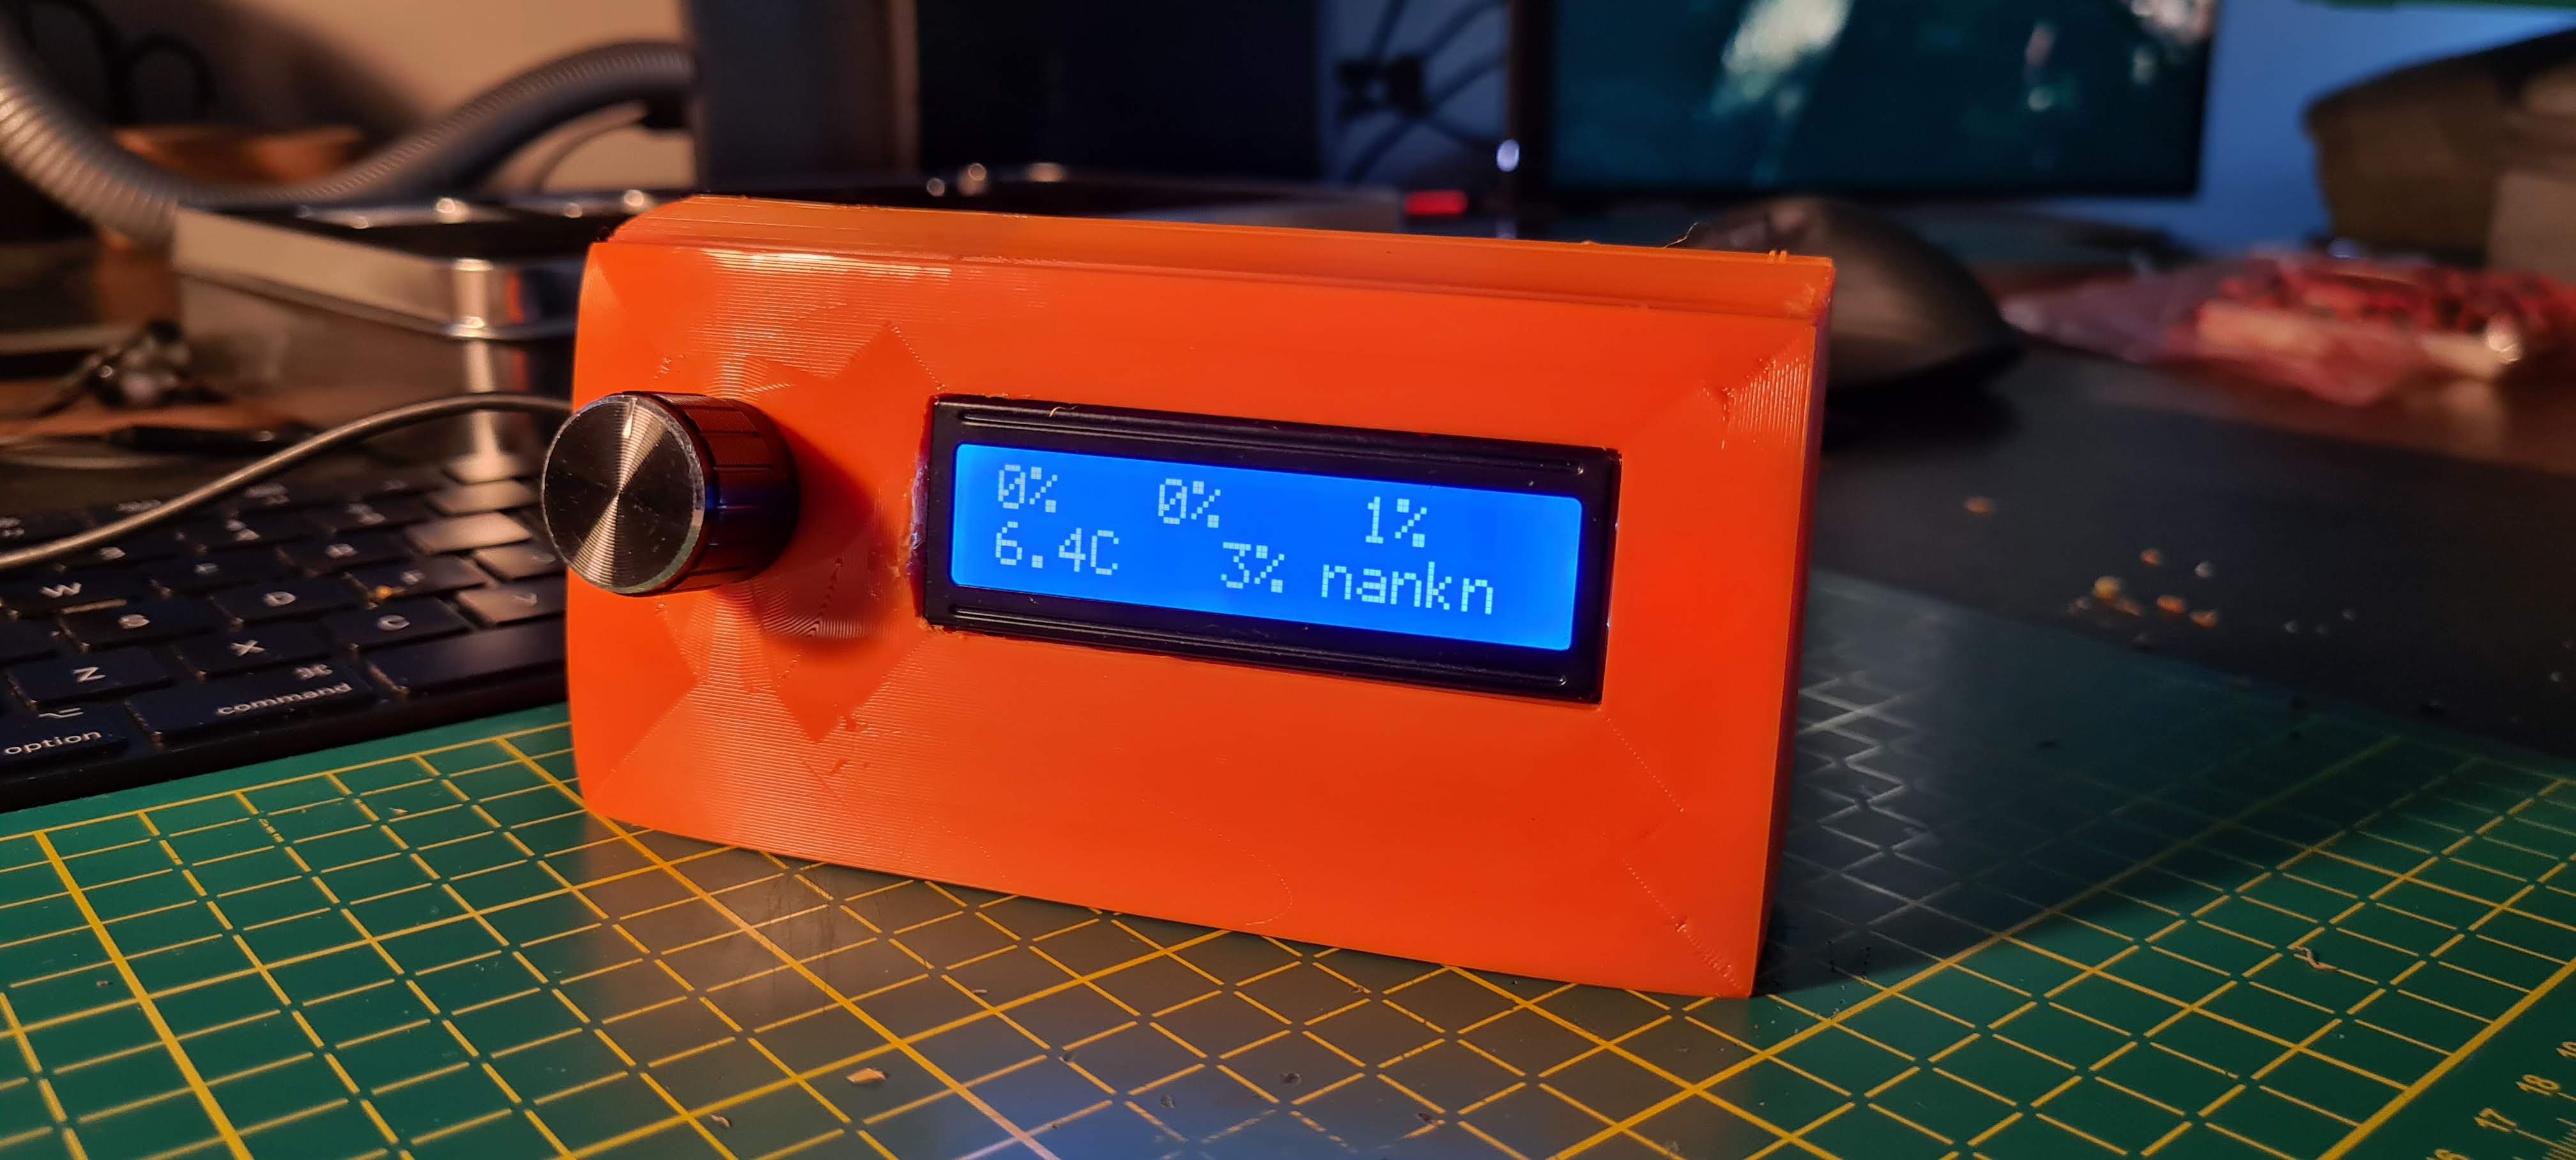
Well, if you read my former post about making my table lamp a bit smarter, you should be aware that the potentiometer offers 255 states. In theory, we could show different data on the screen for each state of the potentiometer. But that would be a nightmarish user experience. We could settle for way less virtual states and keep this a productive tool.
This time, we are aiming for 5 + 1 states. The sixth state is actually just a potentiometer state where we will make the screen turn off, to consume power when we want.

To achieve this, we are going to use our Home Assistant instance, equipped with ESPHome. First, we should add a new ESPHome device with the next configuration
ESPHome configurationyaml
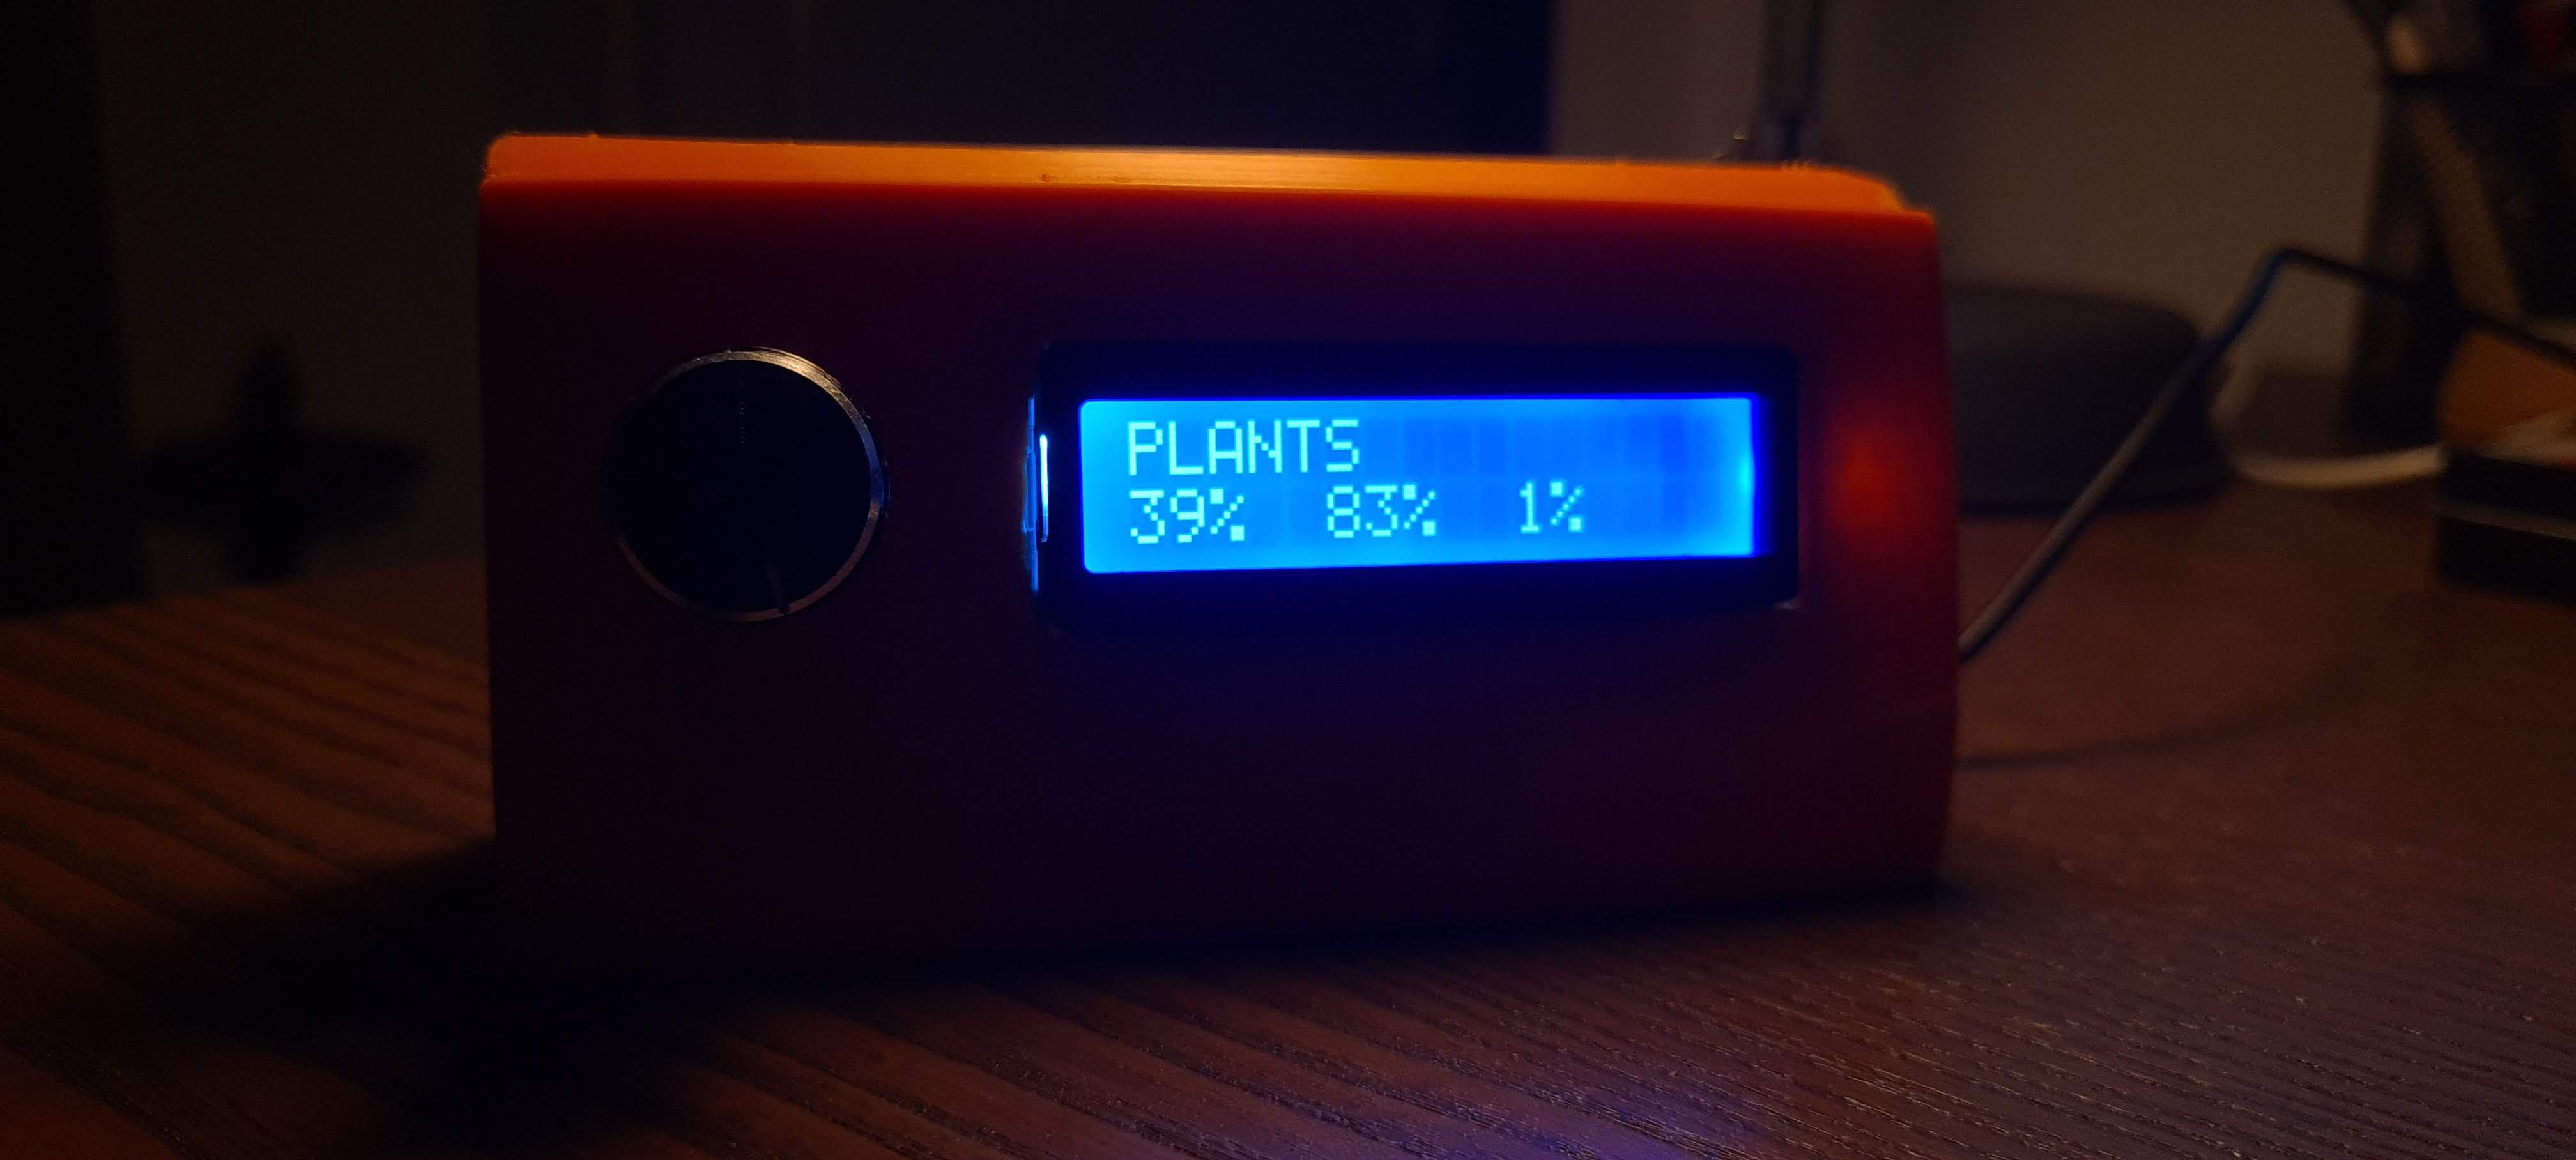
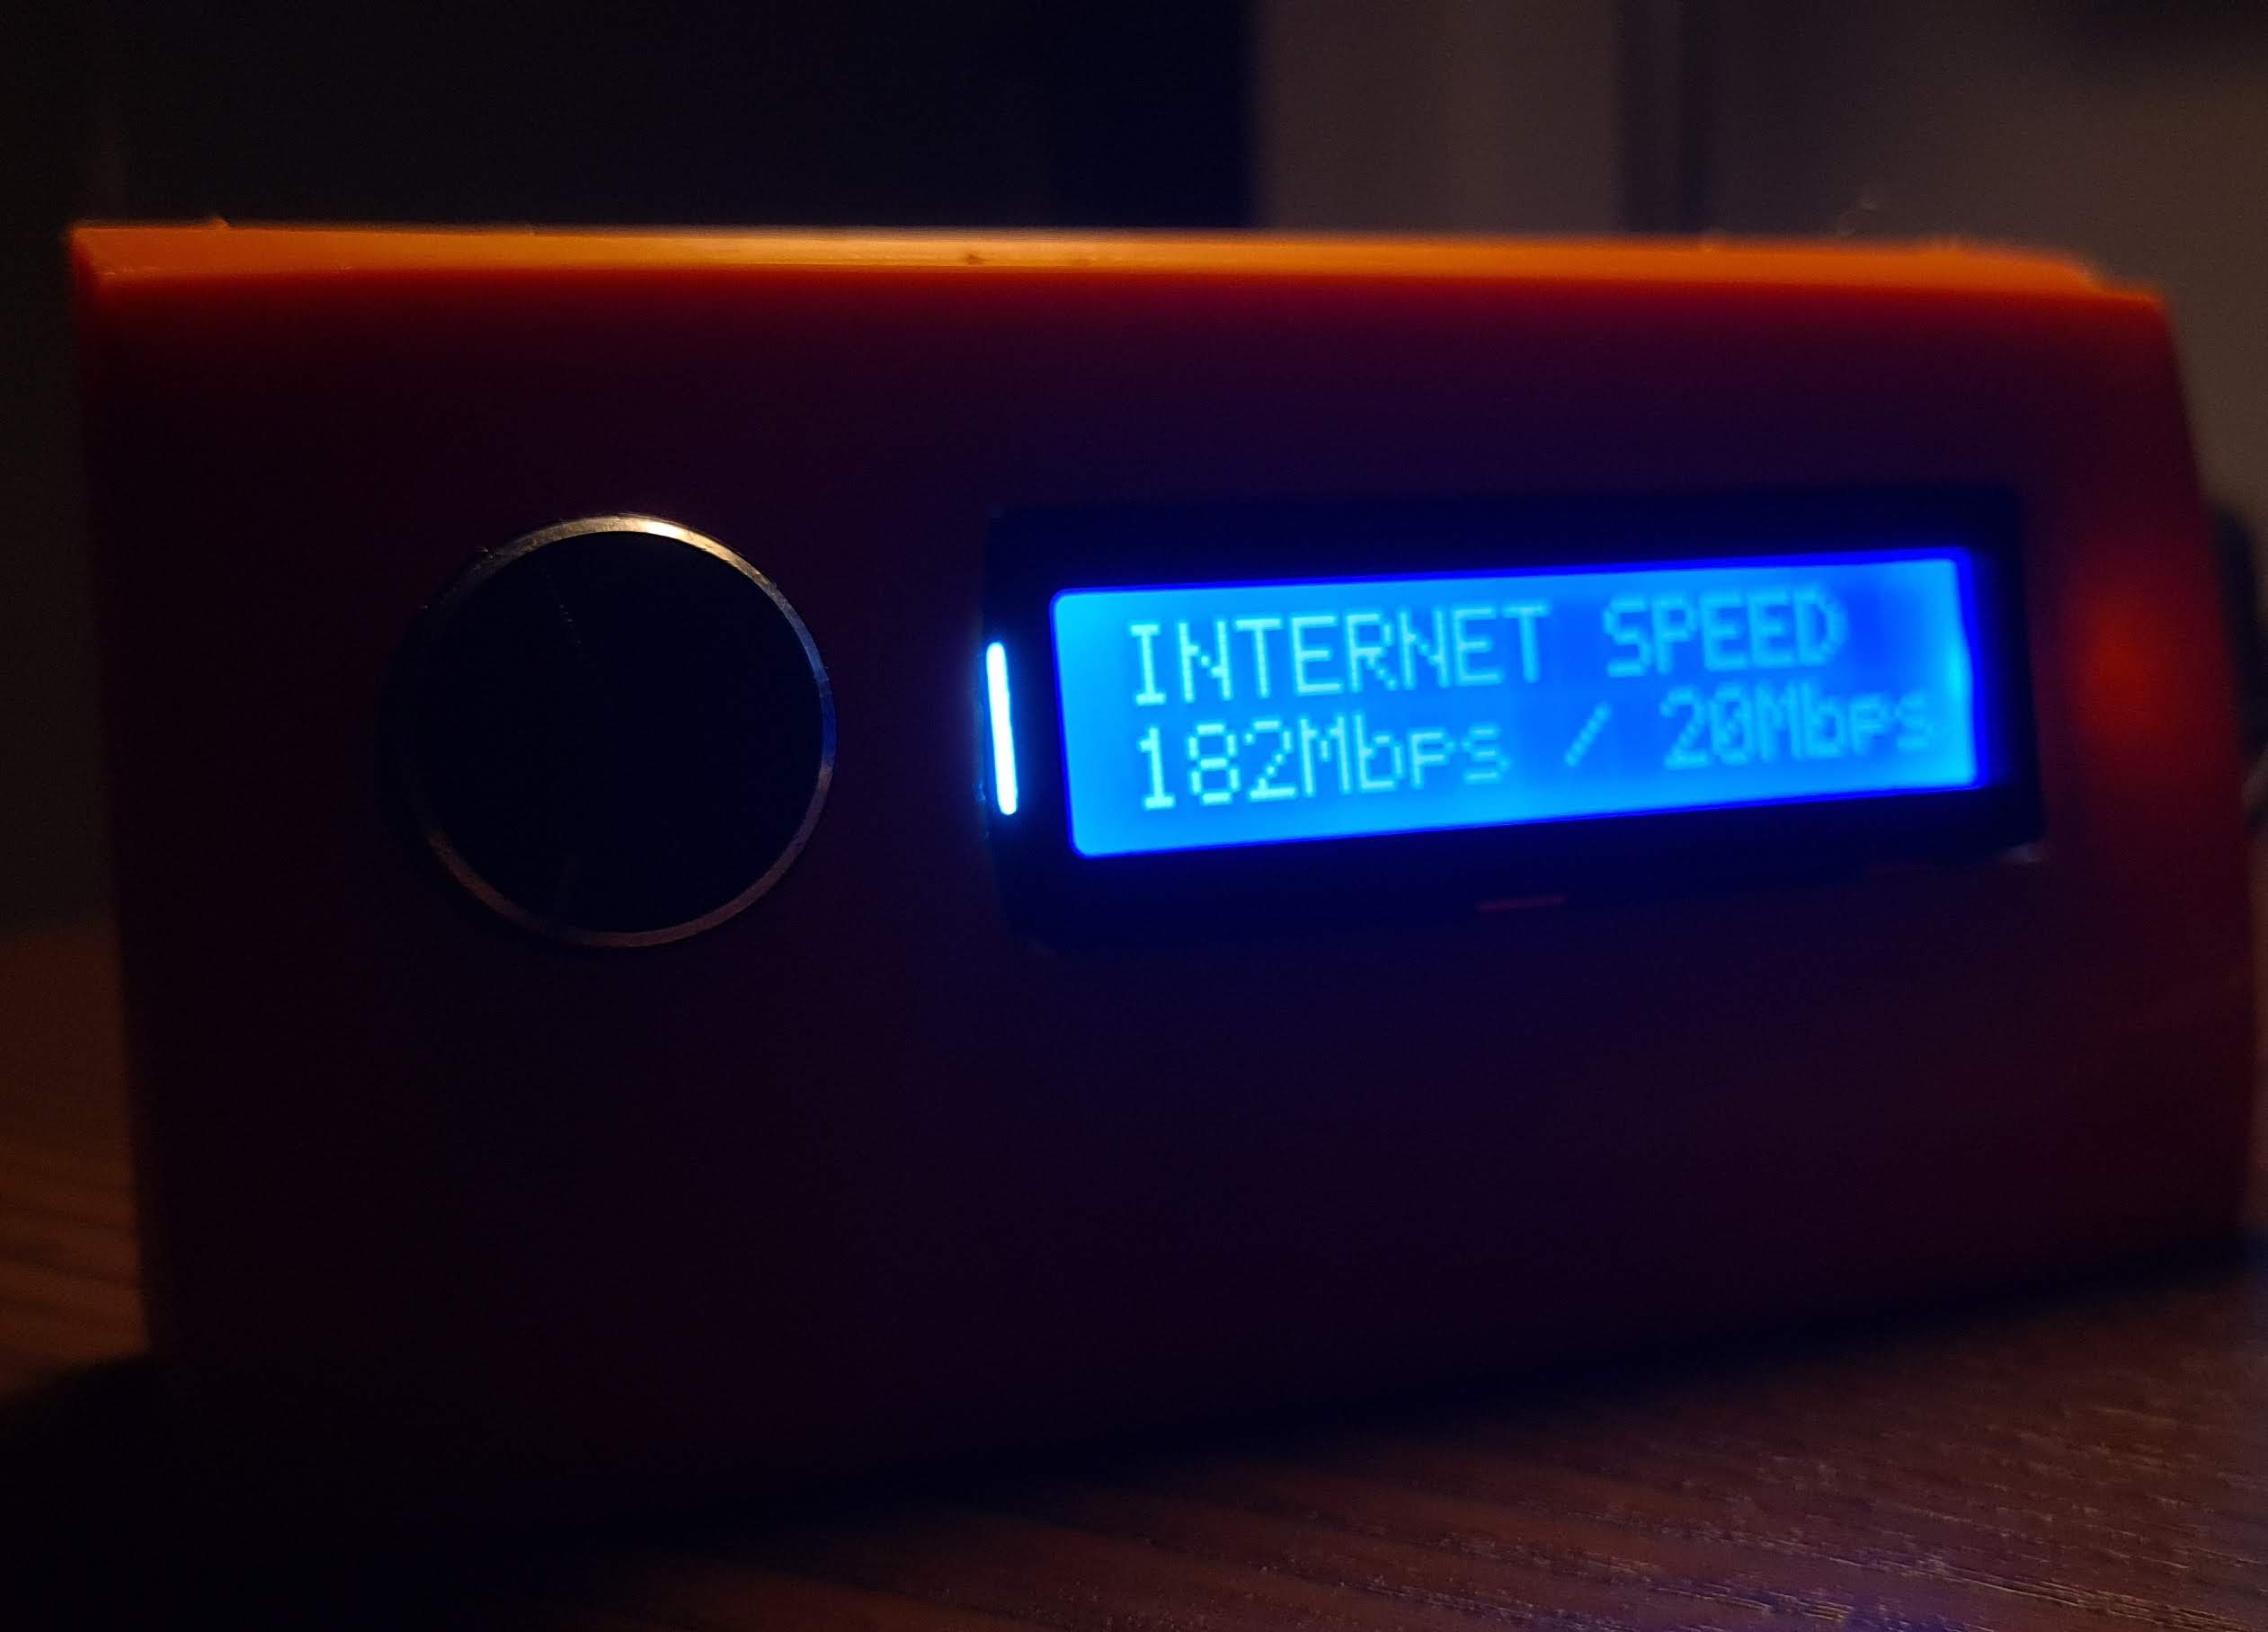
esphome:name: led_displayplatform: ESP8266board: nodemcuv2wifi:ssid: "**********"password: "**********"ap:ssid: "Led Display Fallback Hotspot"password: "**********"captive_portal:logger:api:ota:time:- platform: sntpid: my_timesensor:# reading the potentiometer value- platform: adcpin: A0id: potvalname: "Potentiometer value"update_interval: 0.3sfilters:- calibrate_linear:- 0.0 -> 0.0- 1.0 -> 255.0# additional sensors- platform: homeassistantid: outdoor_tempname: "Outdoor temperature"entity_id: sensor.ble_temperature_a4c138ffcea2internal: true- platform: homeassistantid: speedtest_dlname: "Speedtest Download"entity_id: sensor.speedtest_downloadinternal: true- platform: homeassistantid: speedtest_ulname: "Speedtest Upload"entity_id: sensor.speedtest_uploadinternal: truei2c:sda: D2scl: D1display:- platform: lcd_pcf8574dimensions: 16x2id: mydisplayaddress: 0x27lambda: |-double potvalValue = id(potval).state;double downloadSpeed = id(speedtest_dl).state;double uploadSpeed = id(speedtest_ul).state;double outsideTemp = id(outdoor_temp).state;int numberOfSections = 5;int factor = 255 / numberOfSections;int normalizedValue = potvalValue / factor;if (potvalValue < 5) {id(mydisplay).no_backlight();} else {id(mydisplay).backlight();}if (normalizedValue < 1) {it.printf("TEMP OUTSIDE\n%.0f C", outsideTemp);}if (normalizedValue >= 1 && normalizedValue < 2) {it.printf("INTERNET SPEED\n%.0fMbps / %.0fMbps", downloadSpeed, uploadSpeed);}if (normalizedValue >= 2 && normalizedValue < 3) {it.printf("PRESET 3");}if (normalizedValue >= 3 && normalizedValue < 4) {it.printf("PRESET 4");}if (normalizedValue >= 4) {it.printf("PRESET 5");}
As you can see, I left the last 3 presets without examples. Use your imagination or leave a comment what would you use these presets for. Well, that’s it. There is no need for further HomeAssistant setup, since we are not using the Lovelace interface. In the video below, you can see an example how I’m using the screen as well as how I mounted it on the bottom of my monitor for easy access.
If you like these blogs, feel free to show me some support. I’m a simple dude. A ❤️ or two will keep me going.
Cheers 🍻
Gallery